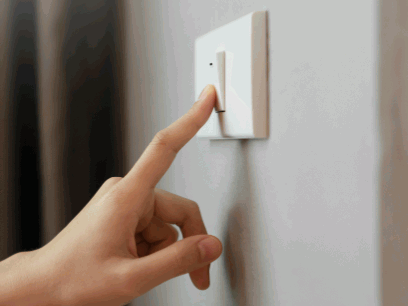
Curious about retrofit lights and how they can benefit your space?
Retrofit lights are a cost-effective and energy-efficient lighting solution that can enhance the quality of light in your home or office.
We will discuss the various types of retrofit lights, including LED, CFL, halogen, and incandescent options. We will also provide a step-by-step guide on how to install retrofit lights safely.
If you're looking to upgrade your lighting setup, keep reading to learn more about the benefits and installation process of retrofit lights.
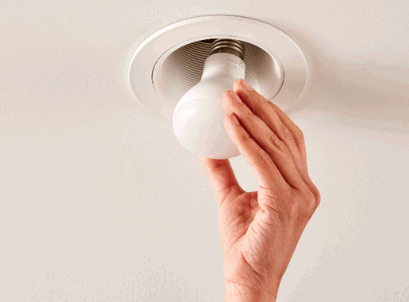
Table of Contents
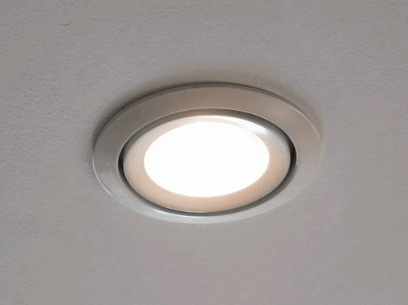
Retrofit lights refer to lighting fixtures that are designed to replace existing lights in a space without the need for major modifications or rewiring. These lights are often used to upgrade older lighting systems to newer, more energy-efficient options such as LED downlights or recessed lights.
Retrofit lights are a cost-effective and environmentally friendly solution for improving the lighting quality of space while reducing energy consumption. By opting for LED downlights or recessed lights as replacements, property owners can enjoy significant savings on electricity bills, as these options are known for their long lifespan and low energy consumption.
The installation process for retrofit lights is relatively simple and quick, making it a hassle-free upgrade that can instantly transform the ambiance of a room. Whether in residential homes, commercial buildings, or industrial settings, retrofit lights find versatile applications where a lighting enhancement is desired without the need for extensive renovation.
Find out more: What Are The Advantages Of LED Lighting
There are several reasons why you should consider installing retrofit lights in your space. These lights offer energy efficiency, cost savings, improved lighting quality, and eco-friendliness, making them a smart choice for both residential and commercial applications.
One notable advantage of retrofit lights is their easy installation process, which can be further facilitated by tools like a center punch. This tool helps create precise holes for mounting the lights securely, ensuring a seamless and professional finish. Retrofit lights are versatile and can be installed in various locations, allowing you to customize your lighting design to suit your specific needs.
One of the key benefits of retrofit lights is their energy efficiency, which helps reduce electricity consumption and lower utility bills. By using energy-saving technologies such as LED bulbs and efficient installations, retrofit lights can significantly decrease your carbon footprint.
Not only does this promote environmental sustainability, but it also results in substantial long-term savings for homeowners and businesses. With the advancement in retrofit technology, incorporating features like Phillips screws for easy installation, the process has become more efficient and user-friendly. By optimizing the lighting system, not only can you create a more comfortable and well-lit space, but you can also contribute towards overall energy conservation efforts, making a positive impact on the environment and your finances.
Installing retrofit lights can lead to substantial cost savings over time. With advancements in lighting technology and the availability of information online, you can make informed decisions about the most cost-effective retrofit options for your space.
One of the significant advantages of opting for retrofit lights is the ability to lower energy consumption and reduce utility costs in the long run. By replacing outdated lighting fixtures with energy-efficient LED alternatives, you not only save money on your electricity bills but also contribute to a greener environment.
With platforms like Google offering a plethora of information on various retrofit lighting solutions, you can easily compare prices, features, and reviews to find the best fit for your specific needs and budget. This accessibility to online resources streamlines the research process and gives you the power to make well-informed choices when upgrading your lighting system.
Upgrading to retrofit lights can significantly enhance the quality of lighting in your interior space.
By taking the time to properly install these lights and avoiding common DIY errors, you can transform the ambiance of your room into a well-lit and inviting space. Utilizing tools like torsion springs can simplify the installation process and ensure that the lights are securely in place, providing a consistent and reliable source of illumination. This attention to detail not only enhances the aesthetics of your space but also contributes to a comfortable and well-lit environment for various activities.
Choosing retrofit lights also aligns with eco-friendly practices and sustainability goals. By utilizing resources like the Wiz app or educational content on platforms like YouTube, you can make environmentally conscious choices when upgrading your lighting systems.
Retrofit lights play a significant role in reducing energy consumption and minimizing environmental impact. These energy-efficient lighting solutions not only lower electricity bills but also decrease the overall carbon footprint, contributing to a greener planet. With the help of modern tools such as the Wiz app, users can efficiently control their lighting settings, optimizing energy usage and enhancing the longevity of the bulbs.
Platforms like YouTube offer a plethora of educational materials on sustainable lighting practices, enabling individuals to learn about the latest trends in eco-friendly lighting technology and implementation. This accessibility to information gives the power to consumers to make informed decisions that benefit both the environment and their wallets.
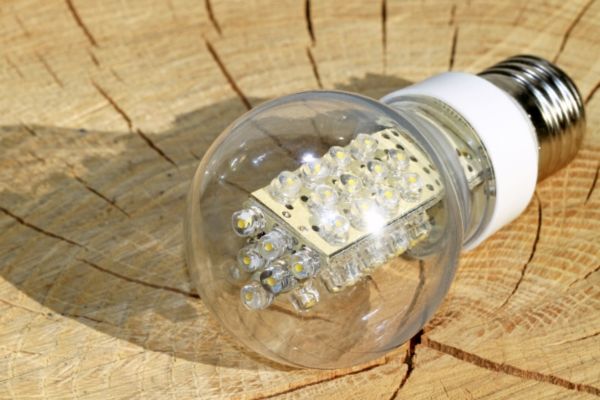
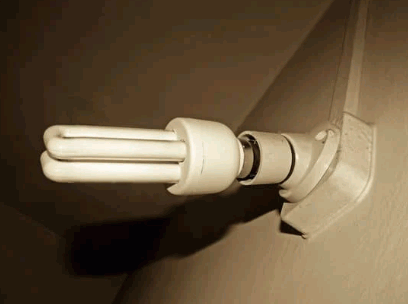
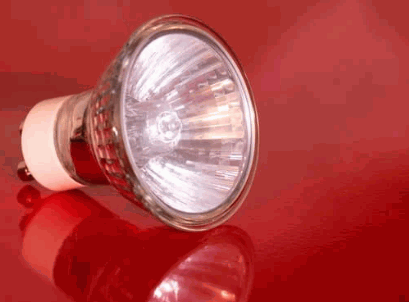
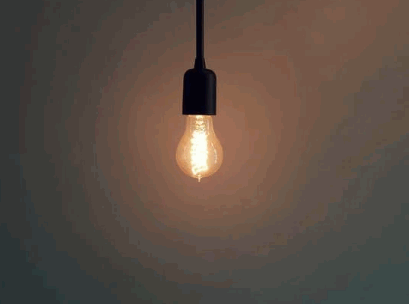
There are various types of retrofit lights available to suit different needs and preferences. Common options include LED retrofit lights, CFL retrofit lights, halogen retrofit lights, and incandescent retrofit lights, each offering unique features and benefits.
LED retrofit lights are known for their energy efficiency and long lifespan. They consume significantly less power than traditional incandescent bulbs, making them an environmentally friendly choice. LEDs produce very little heat, reducing the risk of overheating in enclosed spaces.
CFL retrofit lights, on the other hand, are known for their affordability and widespread availability. They are a popular choice for budget-conscious consumers looking for energy-efficient lighting solutions. Halogen retrofit lights offer a warm, natural light that closely resembles sunlight, making them ideal for creating a cozy ambiance.
Incandescent retrofit lights are a classic choice, providing a warm and familiar glow that many find comforting and inviting.
LED retrofit lights are popular choices for their energy efficiency and longevity. These lights are suitable for various interior applications and can be easily integrated into existing fixtures, providing a modern and eco-friendly lighting solution.
One of the key benefits of LED retrofit lights is their ability to significantly reduce energy consumption compared to traditional lighting options. This not only helps in lowering electricity bills but also has a positive impact on the environment by reducing carbon emissions. LED retrofit lights come in a wide range of color temperatures, allowing for customization based on the desired ambiance and functionality within a space.
CFL retrofit lights offer a cost-effective alternative to traditional incandescent bulbs. With easy installations and compatibility with existing fixtures, CFL lights are a practical choice for spaces where energy efficiency is a priority.
These lights not only help in reducing electricity bills but also have a longer lifespan, making them a smart investment for households and businesses alike. Phillips is a leading manufacturer in the lighting industry that offers a wide range of high-quality CFL retrofit options to meet diverse needs. The versatility of CFL lights allows them to be used in various settings, from residential homes to commercial office spaces, providing consistent and reliable lighting. The environmental benefits of CFL lights, such as lower carbon emissions and reduced energy consumption, make them a sustainable choice for those seeking to reduce their environmental footprint.
Halogen retrofit lights are known for their bright, white light output and instant illumination. These lights often require specific tools for installation and can benefit from following detailed tutorials to ensure proper setup and functionality.
One key feature of halogen retrofit lights is their energy-efficient nature, making them a popular choice for both residential and commercial settings. Their ability to provide focused, directional lighting is another standout characteristic that sets them apart from traditional lighting options.
Regarding installation, using tools such as a screwdriver, wire cutters, and safety gloves is essential for a smooth and secure setup. Watching online tutorials or reading step-by-step guides can greatly assist in understanding the process and avoiding any installation errors that may affect the light quality."
Incandescent retrofit lights offer a traditional lighting option with a warm glow. While these lights may require more frequent replacements compared to newer technologies, their simple installations make them a convenient choice for various lighting needs.
The warm lighting effects produced by incandescent retrofit lights create a cozy and inviting atmosphere in any space, perfect for creating a relaxing ambiance in living rooms or soft, ambient lighting in bedrooms. One key consideration when opting for incandescent retrofit lights is ensuring screw compatibility with existing fixtures, ensuring a hassle-free installation process.
These lights can be easily installed by simply screwing them into compatible sockets, making them a user-friendly option for those looking to upgrade their lighting without the need for complex wiring or additional tools.
Installing retrofit lights can be a DIY project with the right tools and knowledge. By following a step-by-step tutorial and ensuring compatibility with your existing housing, you can upgrade your lighting fixtures efficiently and effectively.
To start the installation process, gather the necessary tools, including a screwdriver, wire cutter, voltage tester, and the retrofit light kit. Ensure that the power source is turned off before beginning. safety precautions
Next, remove the existing light fixture by unscrewing it from the ceiling and disconnecting the wires. Follow the instructions provided in the tutorial carefully, securing the new fixture in place and reconnecting the wires. Check for proper connection and secure any loose components. Consider the compatibility of the retrofit lights with your housing to ensure a seamless fit.
Before installing retrofit lights, it is essential to prepare the area by clearing the workspace, gathering necessary tools, and assessing any potential DIY mistakes. Utilizing tools like torsion springs can aid in securely mounting the new fixtures.
Along with workspace preparation, it is crucial to organize your tools systematically to streamline the installation process. Create a designated area for your tools, ensuring easy access and preventing unnecessary clutter.
To prevent common DIY mistakes, carefully read the manufacturer's instructions and double-check all measurements before drilling or cutting. Proper alignment of the lights is key to achieving optimal illumination, so take your time to ensure accuracy.
Safety is paramount when installing retrofit lights, so the first step is to turn off the power supply to the area where you will be working. This precaution ensures that you can handle the electrical components without any risk, even if one is in a DIY shed.
Working with electricity always demands caution and respect for its power.
Before beginning any installation involving electrical components, it's crucial to prioritize safety. Ensuring that the power source off eliminates the possibility of electric shocks or accidents. Taking the time to switch off the power may seem simple, but it drastically reduces the chances of injury or damage.
In a DIY shed setting, where personal projects take place, safe practices in dealing with electrical work are particularly vital. The peace of mind that comes from properly handling electricity outweighs any inconvenience of temporarily interrupting power during the installation process.
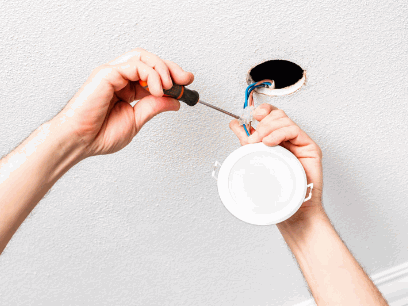
To install retrofit lights, one must remove the old light fixture carefully. Using appropriate tools and techniques, detach the existing fixture from the housing to prepare for the installation of the new retrofit light.
Start by turning off the electricity to the area where the old light fixture is located to ensure safety. You can do this by switching off the breaker that controls the power to that specific circuit. Next, grab a sturdy ladder to reach the fixture safely. It's important to have a voltage tester on hand to make sure the power is completely turned off before proceeding.

Installing the retrofit light involves positioning it correctly within the housing and securing it in place. Utilize clips or c-clips provided with the light fixture to ensure a stable and safe installation that aligns with the manufacturer's recommendations.
Proper positioning of the retrofit light is crucial for optimal illumination and performance. Begin by identifying the designated area within the housing where the fixture will be placed. Ensure that the fixture sits flush and level to avoid any potential issues with light distribution.
Regarding securing the light, carefully follow the instructions provided by the manufacturer. Most retrofit lights come with clips or c-clips that are designed for easy installation. These clips play a vital role in keeping the light fixture securely in place, preventing any shifting or dislodging over time.
Wiring the retrofit light correctly is crucial for its functionality and safety. Secure the electrical connections using appropriate screws and follow the provided wiring diagrams, paying attention to details like polarity indicated by Phillips screws.
When wiring a retrofit light, ensure you have the necessary tools handy, including a screwdriver for tightening the connections securely. The use of Phillips screws helps in easily identifying the correct polarity during the wiring process. It is essential to match the wires according to the diagram provided to avoid any short circuits or malfunctions. Always double-check your connections before closing the fixture. Taking these precautions will not only ensure proper function but also guarantee the safety of your lighting setup.
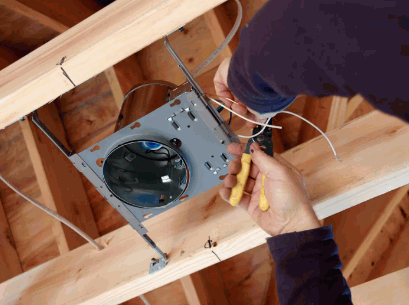
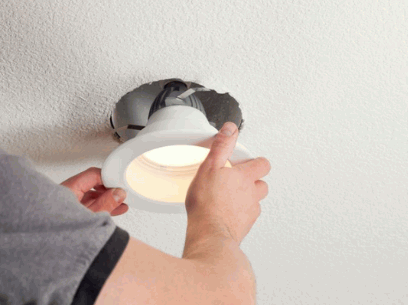
After connecting the wiring, ensure that the light fixture is securely mounted in the housing.
Utilize the appropriate tools to fasten the fixture in place, such as a screwdriver or wrench, ensuring a tight and secure fit. It is crucial to check the alignment of the fixture to avoid any potential hazards and to ensure optimal lighting distribution.
Make any necessary adjustments by gently rotating or shifting the fixture until it sits flush and level within the housing. This step is essential to guarantee stability and prevent any potential hazards caused by loose or misaligned fixtures.
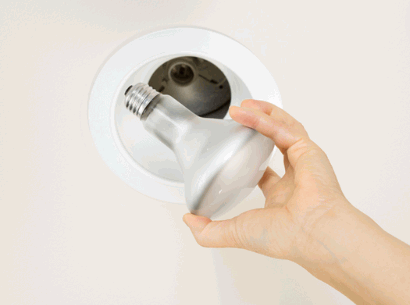
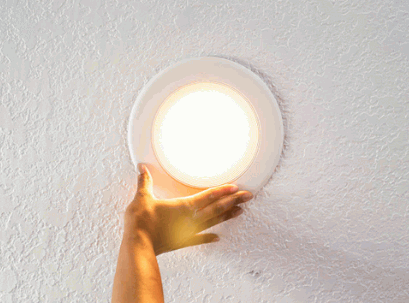
Once the retrofit light is installed, test its functionality by turning on the power supply. Make any necessary adjustments to the positioning or brightness based on your preference or manufacturer instructions, utilizing resources like Google or product information for assistance.
During the testing phase, observe how the light illuminates the intended area and check for any flickering or uneven brightness. If adjustments are needed, consider experimenting with the angle of the light or the distance from the surface to achieve the desired lighting effects. Functionality checks are crucial to ensure the light operates correctly and meets your requirements.
When installing retrofit lights, it is crucial to prioritize safety precautions to prevent accidents and ensure a successful installation process. From turning off the power to wearing protective gear, following these guidelines can help you complete the task safely and efficiently.
Before you begin any electrical work, it's crucial to understand the tutorial and ensure you have the necessary knowledge and skills to safely handle the installation process. Always remember to shut off the power at the circuit breaker before you start to prevent any electrical hazards. When handling electrical components, make sure to use appropriate protective gear such as insulated gloves and safety goggles. Refrain from using damaged cords or equipment during the installation to minimize risks. Following these precautions will ensure a smooth and accident-free retrofit light installation.
Before starting any work on retrofit lights, the first safety precaution is to turn off the power source to avoid electrical hazards. Use appropriate tools if needed to access the power switch or circuit breaker, ensuring a safe working environment with no exposed wires or live currents.
It is crucial to prioritize safety when dealing with electrical installations, as even a small mistake can lead to serious consequences. Turning off the power is not just a suggestion; it is a non-negotiable step to prevent accidents. Remember, screws and wires are not something you want to accidentally come into contact with while power is still flowing. Always double-check that the power is off before proceeding with any work, and keep in mind the potential risks that come with live currents and exposed wires.
Protective gear such as gloves and safety goggles should be worn when handling retrofit lights to prevent injuries from sharp edges or electrical components. Use appropriate tools to minimize physical risks and ensure a secure installation process.
Regarding selecting gloves, opt for ones that provide a good grip and dexterity to handle sensitive components with precision.
Safety goggles should have side shields to protect them from debris and splashes. Remember that these essential protective items are not just for compliance but for your personal safety too.
Utilize insulated tools during installation to prevent electrical shocks, and always work in well-lit areas to avoid straining your eyes.
Take your time to read the manufacturer's instructions carefully and double-check your work to ensure a smooth and accident-free installation process.

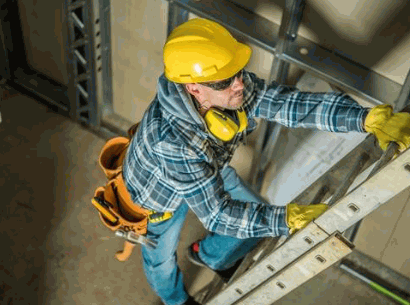
To reach higher areas for retrofit light installations, always use a stable ladder or step stool to prevent falls or accidents. Secure the ladder properly and be mindful of the housing structure to avoid damaging the ceiling or fixtures during the installation process.
When positioning the ladder, ensure all four feet are on a level surface to prevent wobbling that may lead to instability. Clips or hooks on the ladder can be handy for keeping tools close at hand and preventing unnecessary movements. Check the weight capacity of the ladder or step stool to ensure it can support you and your equipment safely. Remember, it's better to take your time and work methodically to ensure a secure foundation rather than rush and risk injury.
Always adhere to the manufacturer's instructions provided with the retrofit lights to ensure proper installation and avoid any potential issues.
Following a detailed tutorial or guide, especially if she is in a DIY shed, can lead to a successful retrofit lighting upgrade. These resources offer step-by-step instructions, tips, and troubleshooting advice for a smooth installation process. By familiarizing yourself with the manufacturer's guidelines and combining them with supplemental tutorials, you can increase the efficiency and safety of your retrofit light setup. Remember, a well-informed approach is key to achieving optimal results and creating the desired lighting ambiance in your space.